You’ve built an amazing iOS app and are ready to share it with the world. But before your app can reach millions of iPhone and iPad users, you need to publish iOS app.
Apple App Store has 2.095 million apps, of which free apps make up 95.3%. Statista report also reveals 38 thousand mobile apps were released through the App Store and is expected to boost revenue in 2025. This means there’s a great potential to collaborate with an iOS application development company.
If you’ve never done this before, the process might seem overwhelming. Apple has strict guidelines, a multi-step submission process, and quality checks that can be tricky to navigate. But don’t worry. We’re here to guide you step by step.
In this blog, you’ll learn how to publish an app to the app store in 2025. We’ll guide you through the requirements for app submissions and how to overcome rejection challenges.
Table Of Contents
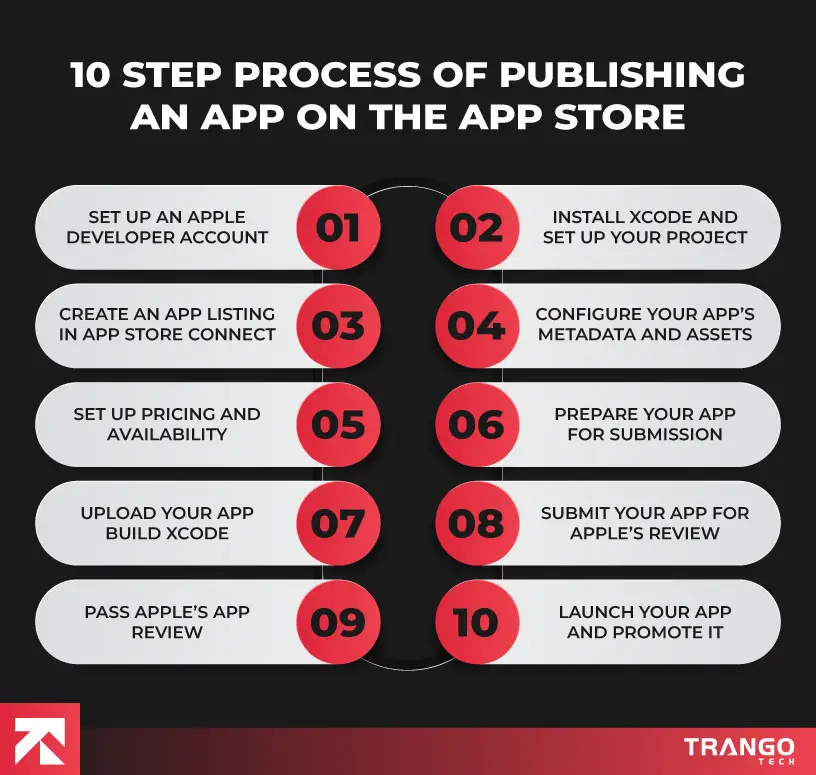
10 Steps Guide on How to Publish An App to the App Store
We know that publishing an app on the Apple Store can be challenging for an amateur. All the rules, guidelines, and technical steps may sound nerve-wracking to you. But what if we tell you that it’s not impossible?
Let’s move forward with how to publish an app to the App Store:
Step 1: Set Up an Apple Developer Account
You need to enroll in the Apple Developer Program before publish iOS app. This account grants you access to tools like Xcode, TestFlight, App Store Connect, and Apple’s APIs. Here’s how to register for an Apple Developer Account:
Click “Account,” then “Join the Apple Developer Program.”
Choose Your Account Type. You have the option to choose between an individual and company account.
Apple will ask for your full name, email, and legal agreement. If you’re enrolling as a company, you’ll need to provide your D-U-N-S number for verification.
The annual fee is $99. After payment, your account will be processed (which can take up to 48 hours).
Once your account is approved, you can start submitting apps to the App Store!
Step 2: Install Xcode and Set Up Your Project
Xcode is Apple’s official development environment (IDE) for building iOS apps. You’ll use it to write and test your code and create an app build for submission. You can also generate certificates and provisioning profiles. If you’re struggling with revoking Apple developer certificate, our blog gives you detailed steps to find relevant solutions.
Here’s how to install Xcode and set up your project:
Get the Xcode downloaded from the Mac App Store (requires macOS).
Use your Apple Developer account to sign in.
If you’re building an app from scratch, select “Create a new Xcode project.” If you have an existing app, open the project in Xcode.
The Bundle ID must match what you register in App Store Connect (e.g., com.yourcompany.yourapp).
Xcode is super important for preparing and uploading your app to the App Store. Make sure it’s up to date. If you’re thinking about how to publish an app to the app store, you need to ensure this step goes smoothly.
Xcode is super important for preparing and uploading your app to the App Store. Make sure it’s up to date. If you’re thinking about how to publish an app to the app store, you need to ensure this step goes smoothly. Wondering about how long does it take to develop an iOS app? Check out our blog, which gives detailed insights into the development process.
Step 3: Create an App Listing in App Store Connect
App Store Connect is Apple’s portal for managing apps on the App Store. Here, you’ll add app details, screenshots, descriptions, pricing, and compliance information.
We’ve broken down the steps on how to create an app in App Store Connect:
Click “My Apps” then “+” which leads to “New App”.
Fill in the required details:
App Name: The official name users will see.
Primary Language: The default language for your app.
Bundle ID: This must match your Xcode project’s Bundle Identifier.
SKU: A unique identifier for internal tracking.
User Access: Choose who can manage the app in your developer account.
4. Click Create to generate your app listing.
This is where you manage everything related to your app on the App Store. Make sure all details are correct. Also, if you’re looking for a detailed guide on how to make an iOS app, our recent blog covers in-depth steps to help you navigate through all the difficulties. This will also make it easy to figure out how to publish an app to the App Store.
Step 4: Configure Your App’s Metadata and Assets
Your app metadata includes everything users see on the App Store, like your description, screenshots, and keywords.
Here are the essential app store information you need to add:
App Subtitle: A short phrase (max 30 characters) summarizing your app.
App Icon: Must be a 1024×1024 px PNG with no transparency.
Screenshots and App Preview: Upload high-quality images showing how your app works (sizes depend on the device).
App Description: A compelling explanation of what your app does (max 4,000 characters).
Keywords: Help users find your app in search results.
Support URL: A webpage where users can get help.
Brownie points: Great visuals and a well-written description increase your chances of getting downloads!
Step 5: Set Up Pricing & Availability
In App Store Connect, you need to define the following:
Is your app free or paid? If it’s paid, you’ll set a price.
Where is your app available? Choose the countries/regions where users can download your app.
Set the appropriate content rating.
Apple charges a 15–30% commission on paid apps and in-app purchases.
Are you looking for recent updates on iOS app development cost? Check out our blog to find accurate estimates based on different factors. Also, you can go for our app development cost calculator for more refined estimates.
Step 6: Prepare Your App for Submission
This process is about preparing your app for submission. Here’s how to publish iOS app:
Go to Xcode, choose preferences, then click “Accounts” to sign in.
Under signing and capabilities, enable “Automatically manage signing.”
Xcode will generate the required certificates and provisioning profiles for submission.
Step 7: Upload Your App Build Using Xcode
After preparation, you can now upload your app to App Store Connect. Here are the following steps on how to upload an app to the App Store:
In Xcode, select Product and go to Archive.
Once archived, click Distribute App.
Choose App Store Connect as the distribution method.
Click Upload and wait for processing.
Step 8: Submit Your App for Apple’s Review
You can submit your app for review before launching it live. Follow these steps on how to submit app to app store:
Go to App Store Connect and select your app.
Click Submit for Review and answer Apple’s compliance questions.
Click Submit to send it to Apple’s review team.
Apple’s app store publishing process usually takes 24 – 48 hours but can take longer if changes are required.
Step 9: Pass Apple’s App Review
The app must be stable, secure, and compliant to pass the review. You can face rejection due to crashes, poor UI/UX design and privacy reasons. Here are the possible solutions:
Test your app thoroughly before submission.
Follow Apple’s Human Interface Guidelines.
Be transparent about data collection.
In case of any rejection during App Store publishing, Apple will provide you with feedback to make changes.
Step 10: Launch Your App & Promote It!
Go to App Store Connect and click Release for Sale. Your app will be live within a few hours. You can keep yourself updated on trends to make your app visible in the market:
Improve keywords & app descriptions.
Monitor reviews & improve features.
Continuous updates and marketing are key to long-term success!
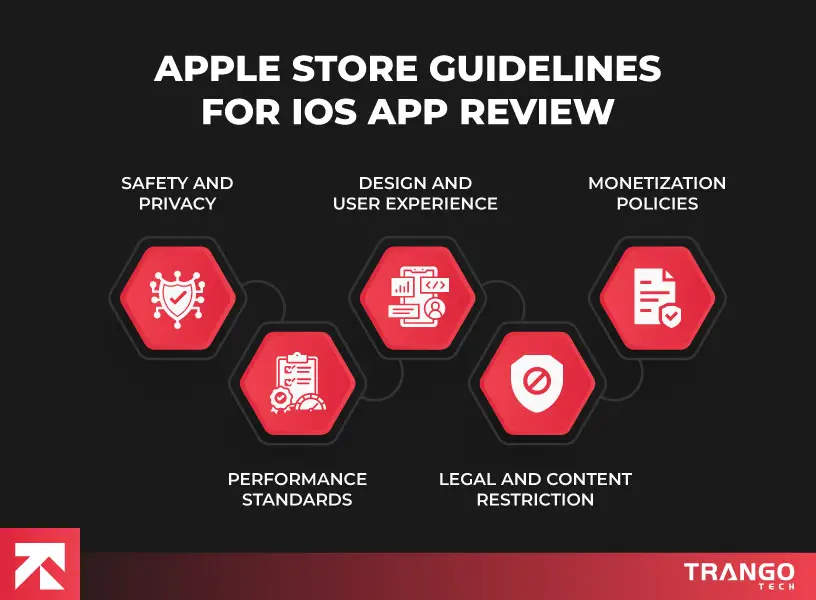
Apple’s official guidelines outline policies for apps submitted to the App Store. It ensures a secure and trustworthy experience for users. These guidelines help protect against security threats, preserve Apple’s brand reputation, and promote fair competition.
Let’s break down the areas you need to focus on during app store submission process 2025:
1. Safety and Privacy of An App
Apple prioritizes user safety and data protection, requiring apps to be free from harmful content or security risks. You must disclose any data collection practices and provide a privacy policy. Additionally, it is important to get user consent before getting personal information like location, contacts, or photos.
Apps that violate Apple’s policies are immediately rejected. Here’s how you can avoid it:
Follow Apple’s privacy guidelines
Use Apple-approved APIs for handling sensitive data
Inform users about data collection and opt-in options
2. Checking Up Performance Standards
Your app must meet Apple’s technical standards by performing smoothly and being bug-free. If your app crashes, takes too long to load, or has broken features, it may get rejected. Also, Apple prohibits apps that imitate fake phone dialers or have misleading icons.
If you want to gain your chances of approval, you need to follow these practices:
Test your app on real iOS devices before submission
Fix any bugs, crashes, or slow performance issues
Follow Apple’s Human Interface Guidelines
3. Clean Design and User Experience
Apple is known for its focus towards high-quality designs. Your app needs to be refined and user-friendly to align with its Human Interface Guidelines. Apps with incomplete features or placeholder content may face rejection.
Apple also expects originality and prohibits misleading design tactics. Here’s how you can improve your chances of approval.
Make sure your app has an intuitive interface with easy navigation.
Avoid copying Apple’s features or using misleading UI elements.
Improve the design for different screen sizes (iPhone, iPad, and different aspect ratios).
Apple enforces strict policies on content and legal compliance. You must ensure there’s no hateful, offensive, or illegal content. Apps must respect intellectual property laws, and monetization features must comply with Apple’s payment policies.
The platform has also taken a strong stance against misleading apps that impersonate others or promote scams. Here are the possible solutions:
Keep content family-friendly and appropriate for Apple’s age rating system.
Avoid misleading descriptions or exaggerated claims about your app.
Clearly define user-generated content policies (moderation and reporting tools).
5. Business and Monetization Policies
It is important that each monetization model must meet Apple’s policies. These Apple monetization guidelines are created to balance revenue with a high-quality user experience. If you want to learn about free in-app purchases on Google Play, check out our blog to find out different methods.
Ads and subscription plans should not be misleading or disruptive, as they cause rejection. Here are the ways to resolve it:
Use Apple’s In-App Purchase system for digital goods.
Clearly explain pricing, subscription terms, and auto-renewal policies.
Ensure compliance with Apple’s revenue-sharing model (15-30% commission).
Tip: Read the latest version of the guidelines on Apple’s official site before you submit app to App Store.
Why Apps Get Rejected & How to Avoid It
Even experienced developers face rejection if they ignore Apple’s guidelines. Here are the top reasons apps get rejected and how to prevent them:
Reason for Rejection
How to Avoid It
Bugs and Crashes
Test your app on real devices, not just the simulator. Use TestFlight for beta testing.
Incomplete App Metadata
Provide all required details (screenshots, descriptions, age rating, etc.).
Privacy Policy Violations
Be transparent about data collection and ensure compliance with Apple’s privacy policies.
Misleading Content or Features
Clearly describe your app’s purpose, and don’t make false claims.
Third-Party Payment Methods
Use Apple’s In-App Purchase system for digital goods and subscriptions.
Poor UI/UX Design
Follow Apple’s Human Interface Guidelines to ensure a seamless experience.
Lack of Sufficient Content
Apps that feel incomplete or offer minimal functionality get rejected.
Provisioning Profile Errors
Ensure correct provisioning profiles are used for app submission to avoid deployment issues.
Metadata Mistakes
Double-check all app metadata (app name, description, keywords, etc.) for accuracy before submission.
Apple’s Revenue & Commission Model: How Apple Takes a Cut from App Developers
If you’re thinking about how to get your app to the App Store, understanding Apple’s revenue and commission model is highly important. Apple takes a cut from app sales and can eventually impact your earnings.
1. Apple’s 30% Commission Fee
Apple’s 30% commission fee applies to:
Paid apps (one-time purchases).
In-app purchases (IAPs), including digital goods and premium content.
Subscriptions, but with a reduced 15% fee after the first year.
Why Does Apple Charge 30%?
Apple justifies this fee by providing:
Access to a global market of over 1 billion iPhone users.
App distribution & hosting via the App Store.
Secure payment processing with fraud prevention.
Developer tools like Xcode, TestFlight, and App Store analytics.
According to Apple’s official guidelines, these fees ensure a secure and high-quality user experience. Are you looking for the answer, “how to choose iOS emulators?” Our recent blog is the right place to look for essential features and top-tier emulator lists.
Who Pays the 30% Commission?
Any developer selling digital goods or services through the App Store must use Apple’s payment system, which automatically deducts 30% from every transaction.
If you sell an app for $9.99, Apple takes $2.99, leaving you with $7.00. If you sell an in-app item for $4.99, Apple keeps $1.49, and you get $3.50.
2. Apple’s Small Business Program: 15% Commission for Qualifying Developers
To support small developers, Apple introduced the Small Business Program in 2020. This program reduces the commission fee to 15% for developers earning under $1 million per year.
Who Qualifies for the 15% Commission?
Developers earn less than $1M annually from all apps combined.
New developers automatically qualify.
If earnings exceed $1M, the fee returns to 30% for the rest of the year.
Who Doesn’t Qualify?
Developers earning over $1M per year.
Large corporations and subsidiaries of major tech companies.
Developers who have previously crossed the $1M threshold (until the next calendar year).
How to Apply?
Developers can apply via Apple’s official Small Business Program page. For example, a small business earning $500,000 per year will pay Apple $75,000 (15%). A business earning $2 million per year will pay $600,000 (30%).
When it comes to downloading apps, the big debate has always been Google Play vs. Apple Store. If you love variety, Google Play is your best bet. With over 3.5 million apps, it has nearly twice as many as the Apple App Store. Plus, Google’s approval process is more relaxed.
On the other hand, Apple’s App Store is much stricter and has the best quality control. Apple carefully reviews every app before approval. It helps prevent low-quality and scammy apps from making their way to your iPhone.
If you want more variety and plan to offer free apps, go for Google Play. When it comes to quality, security, and premium experience, Apple Store is the best option out there.
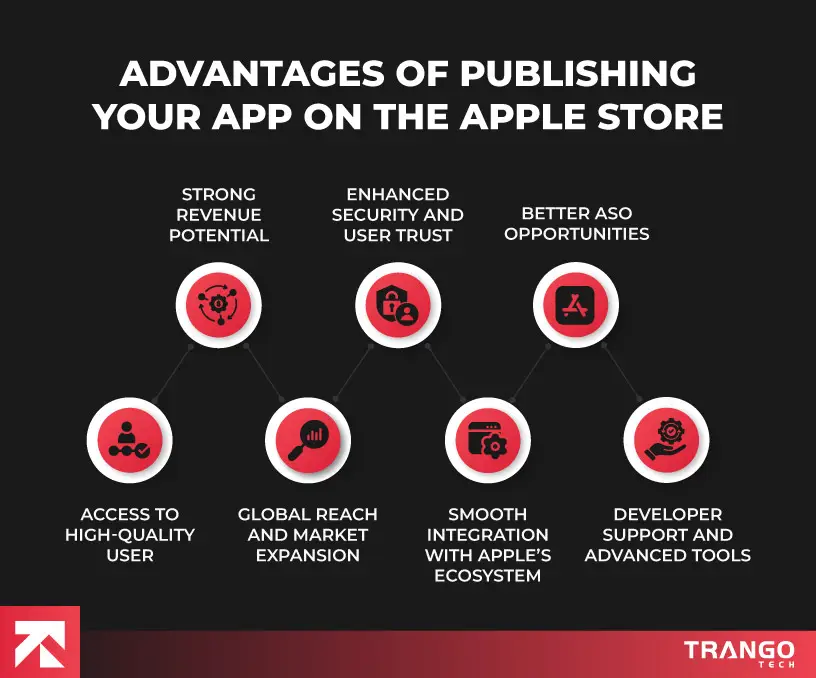
Benefits of Publishing on the Apple App Store
The Apple App Store is one of the best publishing platforms. With over 1.8 million apps online, it gives businesses a massive opportunity to grow, earn revenue, and reach a global audience.
But what makes publishing on the App Store so beneficial? Let’s dive into the key advantages:
1. Access to a High-Quality User
One of the biggest advantages is the quality of its user base. iPhone users are highly engaged and spend more on apps. This makes them a valuable audience for developers.
Additionally, Apple users expect the best experience and encourage developers to build high-quality products.
2. Strong Revenue Potential
If your goal is to make money from your app, Apple’s App Store is the place to be. iOS users are more likely to pay for apps or make in-app purchases. Apps like Tubi, Spotify, and fitness apps thrive because Apple users are more comfortable with subscriptions.
Also, a recent report states that Apple’s App Store generates nearly double the revenue of the Google Play Store despite having fewer downloads. If revenue is a key priority for you, Apple is where the money is. Looking for the best iPhone apps that must be present in your iOS? Check out our recent blog to get insights on the most trending lists.
3. Global Reach and Market Expansion
The Apple App Store is available in over 175 countries, making it easier for your app to reach users worldwide. Apple’s ecosystem supports multiple languages, currency conversions, and region-specific features.
Also, if you’re targeting multiple countries, Apple’s built-in localization tools can help translate your app’s content and improve it for different regions. This can significantly boost downloads and engagement in the international markets. If you’re struggling with deciding between Android vs iOS development, our blog presents the pros, cons, and key complexities of each platform.
4. Enhanced Security and User Trust
Apple has a strong reputation for security and privacy. This means that users trust the apps they download from the App Store. This works in your favor as trust leads to more downloads. Users will mostly install and engage with apps that come from a trusted platform.
Moreover, iOS apps go through a strict review process to allow high-quality apps to the store. If your app deals with sensitive user data like finance or healthcare, Apple’s privacy-first approach can actually be a selling point.
5. Smooth Merging with Apple’s Ecosystem
Apple’s entire ecosystem gives users an amazing experience if they publish their apps on iOS. You can integrate the following into your app:
Siri for voice commands
Apple Pay for fast, secure payments
HealthKit for fitness tracking apps
ARKit for augmented reality features
iCloud for seamless data syncing across devices
Apple users want a unified experience, and using these tools can enhance your app’s functionality and user engagement.
6. Better App Store Optimization (ASO) Opportunities
Apple provides powerful tools and ranking factors that help the right audience find your app. The major ones include keyword-based search rankings, app previews, promo videos, and App Store features.
If your app is upgraded in the right way, you don’t have to rely on paid ads. The App Store can help drive organic traffic to your app.
7. Developer Support and Advanced Tools
Apple invests in top-tier tools and resources. You can access tools like Xcode and Swift, TestFlight, and App Store Connect during publishing.
Wondering about how to publish an app to the App Store? The following tools help you build, test, and refine your app efficiently. This ensures a smooth launch with less hassles.
Create an iOS App with Professional App Developers
The iOS sector offers a massive opportunity for those looking for global exposure. So, whenever you’re publishing your app, you may encounter hurdles along the way. This guide is well-detailed to navigate you through how to submit app to App Store in 2025. So, you don’t have to waste your time and money.
If you’re thinking about partnering with a mobile app development company, Trango Tech is a great option to pursue. Partner with the leading experts today to market your app efficiently.
Frequently Asked Questions (FAQs)
How much does it cost to publish an app on the Apple Store?
The cost of publishing an app is $99 annually on the Apple Store. If you’re developing an app for a company’s internal operations, you need to sign up for the App Developer Enterprise program. This program will cost you $299 annually. You can find tools like beta testing through TestFlight app marketing features.
Moreover, if you’re going for in-app purchases or a subscription model, Apple uses a 15-30% commission.
How long does it take for an app to be approved by Apple?
Let’s put it this way that there’s no deadline. Normally, it takes 24-48 hours for an iOS app review. If your app violates any policies, the review may take longer. Apple conducts a thorough evaluation to make sure it complies with its official guidelines.
You’ll get a feedback in case of rejection to help you make the changes. To improve your chances of approval, make sure your app is free from bugs and has accurate metadata.
If you need a faster review, you can submit an urgent request, though approval is not guaranteed.
How to make an app on the Apple Store?
You need to start by enrolling in the Apple Developer Program to get started. Then using Xcode, you can develop your app with Swift or Objective-C. Before you submit, test it thoroughly on iOS devices and use TestFlight for beta testing. Finally, you can submit your app through App Store Connect after everything is working perfectly. So, if you’re still wondering about how to publish an app on the App Store, partner with a leading expert now.
Is an Apple Developer account free?
Apple Developer Account isn’t free. You need to enroll first to publish your app, and this comes with an annual fee. This membership gives you access to tools like Xcode, beta testing, and other development resources. If you just want to explore Xcode and build apps for personal use, you can do so without a paid account.
Can I publish an iOS app by myself?
You can easily publish an iOS app on your own. All you need is a Mac, Xcode, and some familiarity with Swift or Objective-C. You can publish it by yourself, but it is better to work with an experienced iOS developer to make things much easier.
Rida Shahzad is a business graduate and seasoned content writer at WareGo, where she transforms complex concepts into clear, actionable content. With a strong background in creating how-to guides, conversion-focused content, and technical documentation, Rida excels at bridging the gap between advanced technology and real-world business needs. Off the page, she’s a curious mind with a love for ancient history, tech trends, and creative sketching.