How to develop an Android app? In this tutorial, you’ll learn how to create a simple 3-page Android app using Android Studio, tailored to beginners who want a hands-on, practical guide. Our app will include three main components: a home page with a search bar, a side drawer for navigation, and a button to move between pages.
We’ll be using Java/Kotlin for backend functionality and XML to design the front-end layout. By the end, you’ll have built a fully functional app that provides foundational knowledge for future Android projects. To this date, many Android app development companies use these technologies for their development services due to their authenticity.
Let’s set a strong foundation by clearly defining the project’s goals and emphasizing the advantages of using Android Studio and Java. Here’s a breakdown to ensure you get the context and are fully prepared:
Table Of Contents
Brief Overview of the Project Goal
This project aims to build a straightforward 3-page Android app that introduces key concepts in Android development. Through this project, you will create:
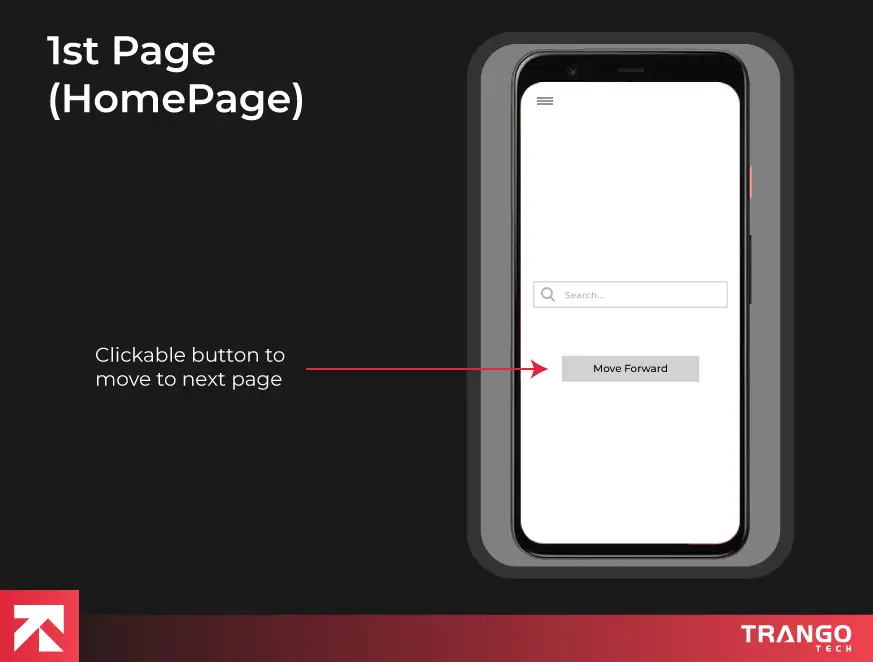
A Home Page with a static search bar, a side navigation drawer, and a “Move forward” button.
A 2nd Page with navigation functionality to a final, 3rd page.
A 3rd Page with a button to return to the Home Page.
By completing this tutorial, you will understand how to:
Set up basic layouts, add interactive buttons, and navigate between activities.
Implement a side navigation drawer to improve user accessibility.
Test their app using Android Studio’s emulator or their own device.
Purpose of Using Android Studio & Java
Before we start with the Android app creation, it is essential to understand both Android Studio and Java. These two are the pillars behind the development of an Android application. So, let’s figure them out:
Why Android Studio?
Official IDE: Android Studio, developed by Google, is the official IDE for Android development, offering tools optimized for creating Android apps.
Integrated Tools: It includes a range of tools like the Layout Editor, AVD (Android Virtual Device) Manager, and code templates to make Android apps accessible.
Debugging & Testing: The built-in emulator and debugging tools help troubleshoot and test applications efficiently, which is essential for smooth development.
Why Java?
Popular Language: Java is one of the core languages for Android development, widely used for its simplicity and readability. Meanwhile, there are multiple frameworks for Android app development that you can leverage for the incorporation of diverse elements and components in your Android app.
Support & Libraries: Java has a vast ecosystem of libraries, tutorials, and community support, making it beginner-friendly and reliable for app development.
Backward Compatibility: Java-based Android apps tend to have high compatibility across Android versions, ensuring a broader reach to users.
Together, Android Studio and Java provide a wholesome development environment, enabling you to experience a smoother development process as they build their first Android app. Therefore, they both are considered among the primary Android app development tools.
Steps to Create Your First Android App Practically
How to create an app for Android? Dive into a hands-on guide to building your first Android app from scratch. This section covers essential steps, from setting up your tools to creating, testing, and refining your app, empowering you to bring your ideas to life efficiently.
1. Setting Up the Environment
Learn how to set up Android Studio, configure the SDK, and prepare the emulator. This step ensures you have a fully equipped development environment to start building your app seamlessly.
Downloading and Installing Android Studio:
Follow each of the following steps to ensure a smooth installation of Android Studio on your system:
Download Android Studio: Go to the official Android Studio download page and select the appropriate version based on their OS (Windows, macOS, or Linux).
Run the Installer:
On Windows: Run the .exe file and follow the installer prompts.
On macOS: Open the .dmg file and drag Android Studio to Applications.
On Linux: Extract the downloaded .zip file and run Android Studio from the folder.
Initial Setup Wizard: Launch Android Studio, which starts a setup wizard to help configure the IDE and download essential SDK components (Software Development Kit). Also, check the Android Virtual Device (AVD) option for emulator setup.
Helpful Tip: Make sure to check the box to install the Android Virtual Device (AVD), which is essential for testing apps.
Overview of the Android Studio IDE:
The Android Studio IDE (Integrated Development Environment) includes a range of essential tools to build Android apps:
Project View: Located on the left, this shows your app’s file structure. Important folders include java/ (for code), res/ (for resources like images and XML layouts), and manifest/ (which contains the app’s configuration file).
Code Editor: The main area for writing Java code and XML layout code.
Layout Editor: Used for visually designing the app’s user interface. You can drag and drop UI components like buttons, text fields, etc., directly onto the layout.
Toolbar: Provides quick access to run the app, debug, and open other Android Studio tools.
Logcat: Found at the bottom of the IDE, it displays log messages and debugging information, crucial for troubleshooting during app development.
Pro Tip: You should familiarize yourself with the layout editor and Logcat from the start, as they will be used frequently throughout your Android app development.
Setting Up the Android SDK:
Follow these steps to set the configuration of your Android SDK:
Check SDK Manager: Under “Tools” > “SDK Manager,” confirm that the latest Android SDK version and essential SDK tools (such as Android SDK Build-Tools) are installed.
Select Target SDK: Choose a target API level that ensures compatibility with most Android devices (e.g., API 29 or above).
Tip: Make sure you know that the SDK Manager can install additional SDK versions if they need to test for different Android versions.
Setting Up the Emulator:
Follow these steps to set up your emulator for running the project:
Creating an Emulator: Go to “Tools” > “AVD Manager” and click “Create Virtual Device.”
Select Device Model: Choose a common model like “Pixel 4” for consistent testing.
Choose System Image: Select the latest stable Android version as the system image.
Final Settings: Configure memory, storage, and resolution settings if necessary.
Running the Emulator:
Start the emulator by clicking the green play icon next to your device in AVD Manager.
Allow a few minutes for the emulator to load the first time.
This setup is critical for a seamless development experience. Each of these steps ensures that you have a well-configured environment ready for coding and testing the app.
2. Creating the First Project
Let’s initiate a new project in Android Studio. Here, we will cover all the details of configuring project settings, selecting templates, and initializing the workspace for a smooth development experience.
Creating a New Project in Android Studio:
Here are the simple steps to create your new project in Android Studio:
Open Android Studio: Launch Android Studio, and on the welcome screen, click “New Project”.
Select Project Template: Choose a project template suited for beginners, such as “Empty Activity”. This template provides a basic activity layout and is a clean starting point for building custom features.
Click “Next” to proceed with project configurations.
Configuring Project Settings:
This configuration step is crucial for setting up project details and making future modifications easier:
Name: Enter a project name, like “MyFirstApp,” which will be visible to you.
Package Name: The unique identifier for the app, auto-generated based on the project name (e.g., com.example.myfirstapp). You can customize this if needed, but it’s best left as is for simplicity.
Save Location: Choose where the project will be saved on the device. A default location works well, but you can change it as per your preference.
Language: Select Java as the programming language.
Minimum API Level: Choose an API level compatible with a majority of devices, such as API 21 (Android 5.0), to balance functionality with device compatibility.
Tip: Understand that a lower API level increases compatibility with older devices, while a higher one allows more advanced features but restricts accessibility on older versions.
Initializing the Workspace:
After clicking “Finish”, Android Studio will create the project files and load the workspace. This initial setup might take a few moments as Android Studio prepares everything.
When working in Android Studio, understanding the project structure is essential for efficient development. Below are the key folders you’ll frequently interact with:
java/ Folder: Contains all the Java or Kotlin source code files, including activities, fragments, and other logic. It also houses the package structure for your app.
res/ Folder: Stores all the app’s resources like XML layout files (layout/), drawable resources (drawable/), strings, styles, and other configurations.
manifest/ Folder: Includes the AndroidManifest.xml, defining app-level configurations, permissions, and component declarations like activities and services.
Gradle Sync: The project setup will automatically sync Gradle (Android’s build automation tool) to ensure dependencies are updated. So, let this process complete, as it’s essential for successful project compilation.
By following this setup closely, you will have your first project ready. With a basic activity and configured project settings, you can ensure the preparation for the next steps in building Android app. Each detail is based on the understanding of project structures and configurations, preventing confusion as they begin coding .
3. Building the 1st Page (Home Page)
Let’s begin with building the Home Page (1st Page) of your Android app, covering a static search bar, side drawer navigation, and a “Move Forward” button. Here’s how to approach each component in detail:
Search Bar: Code for Adding a Static Search Bar (Front-End Only)
XML Layout: Add the search bar in their activity_main.xml file using the <EditText> element to make it look like a search input field. For this static version, configure it to be non-interactive by setting android:editable to false.
Explanation: This code snippet defines a non-functional search bar with a placeholder text “Search…”. The inputType="none" setting makes the search bar static.
Side Drawer with Navigation:
Implementing a Side Drawer: In activity_main.xml, set up a DrawerLayout as the root layout to enable a side drawer.
Add a NavigationView inside DrawerLayout for the menu, where items for “Home Page,” “2nd Page,” and “3rd Page” will be defined.
Code Snippet (xml):
 <androidx.drawerlayout.widget.DrawerLayout
android:id="@+id/drawer_layout"
android:layout_width="match_parent"
android:layout_height="match_parent">

<!-- Main content -->
<LinearLayout
android:layout_width="match_parent"
android:layout_height="match_parent">
<!-- Other UI elements like search bar and button go here -->
</LinearLayout>

<!-- Side drawer menu -->
<com.google.android.material.navigation.NavigationView
android:id="@+id/nav_view"
android:layout_width="wrap_content"
android:layout_height="match_parent"
android:layout_gravity="start"
app:menu="@menu/drawer_menu" />
</androidx.drawerlayout.widget.DrawerLayout>
Menu XML (drawer_menu.xml): Create a new menu file drawer_menu.xml in the res/menu/ directory, with menu items for navigation.
Explanation: This layout provides a side drawer with menu options. The NavigationView uses a menu resource (drawer_menu.xml) to define navigation items.
Navigation Logic: In the main activity Java file (MainActivity.java), add code to handle navigation item clicks. Using a DrawerLayout listener, set up transitions to the second and third pages when users select these options.
Code Snippet (java):
 navView.setNavigationItemSelectedListener(new NavigationView.OnNavigationItemSelectedListener() {
@Override
public boolean onNavigationItemSelected(@NonNull MenuItem item) {
int id = item.getItemId();
if (id == R.id.nav_home) {
drawerLayout.closeDrawer(GravityCompat.START);
return true;
} else if (id == R.id.nav_page2) {
startActivity(new Intent(MainActivity.this, Page2Activity.class));
return true;
} else if (id == R.id.nav_page3) {
startActivity(new Intent(MainActivity.this, Page3Activity.class));
return true;
}
return false;
}
});
Explanation: The onNavigationItemSelected method allows users to navigate to other pages based on selected menu items.
‘Move Forward’ Button:
Button in XML Layout: Add a button in activity_main.xml for the “Move Forward” action.
Button Click Event (MainActivity.java): In MainActivity.java, set up an OnClickListener to transition to the second page (Page2Activity) when the button is clicked.
Explanation: This code defines a button to navigate from the Home Page to the 2nd Page. When clicked, the button initiates a new Intent to switch activities.
5. Building the 2nd Page
Implement a button labeled “Move to Last Page” that directs users from the 2nd page to the 3rd page.
Create Page2Activity.java: In your Java folder, create a new Activity named Page2Activity.java. This class represents the 2nd page.
XML Layout (activity_page2.xml): Define the button in activity_page2.xml with relevant attributes:
Code Snippet (xml):
 <Button
android:id="@+id/button_to_last_page"
android:layout_width="wrap_content"
android:layout_height="wrap_content"
android:text="Move to Last Page"/>
Button Click Listener (Page2Activity.java): Open Page2Activity.java and set up an OnClickListener for the button to transition to the 3rd page (Page3Activity).
Explanation: This code provides a button that, when clicked, initiates a new Intent to open Page3Activity, representing the 3rd page. The OnClickListener ensures seamless navigation from the 2nd page to the final page in the app.
6. Building the 3rd Page
Add a button labeled “Back to Home Page” on the 3rd page, allowing users to navigate back to the Home Page.
Create Page3Activity.java: Create a new Activity named Page3Activity.java for the 3rd page.
XML Layout (activity_page3.xml): Define the button layout in activity_page3.xml:
Code Snippet (xml):
 <Button
android:id="@+id/button_back_home"
android:layout_width="wrap_content"
android:layout_height="wrap_content"
android:text="Back to Home Page"/>
Button Click Listener (Page3Activity.java):
In Page3Activity.java, set up the OnClickListener for the button to navigate back to MainActivity (the Home Page).
Explanation: This code allows the user to return to the Home Page by clicking the “Back to Home Page” button. The button’s click listener starts a new Intent to MainActivity, effectively taking the user back to the first page of the app.
Testing and Running the Application
Understand how to test and run your app on emulators and devices when you are done with the development of your Android app. Although there are several Android app testing tools to check full-fledged applications. For this basic app, we can conduct the testing manually. Here, you ensure your app functions correctly, with thorough navigation flow and component testing.
Testing Navigation Flow:
Follow the given instructions to ensure a smooth navigation flow across all pages:
Home Page (1st Page):
Verify the static search bar is displayed correctly and that the side drawer opens with the options “Home Page,” “2nd Page,” and “3rd Page.”
Click the Move Forward button to check that it navigates to the 2nd page.
2nd Page:
Ensure the “Move to Last Page” button redirects correctly to the 3rd page.
3rd Page:
Confirm that clicking “Back to Home Page” navigates back to the 1st page.
Validating Component Functionality:
Check the functionality by validating each of the following components:
Side Drawer Navigation:
Test each item in the side drawer, making sure it properly navigates to the designated pages when clicked.
Navigation Flow:
Go through each navigation path repeatedly to ensure no issues or crashes occur during transitions.
Running the App on an Emulator or Device:
Follow the methods below to run your app on both the emulator and the device:
Set Up an Emulator:
Open Android Studio, navigate to Tools > AVD Manager (Android Virtual Device Manager), and create a new virtual device.
Select a phone model and download the latest system image if required. Configure the device settings, then launch the emulator.
Running on a Physical Device:
Connect your device to your computer with USB debugging enabled (found under Developer Options on your Android device).
Choose the device from the Run/Debug configurations drop-down menu in Android Studio, then click Run (or press Shift + F10) to install and launch the app on your device.
With these steps, you will have built-out navigation from the Home Page to the 2nd and 3rd pages, and back to the Home Page. Each button serves a specific navigation purpose, creating an intuitive flow through the app. You must test each button to verify that navigation works as expected. This will make the app fully functional for basic multi-page navigation.
Process Summary of Android App Development
Let’s recap the core elements achieved in building this basic multi-page Android application. Here’s a summary of what you accomplished in this tutorial:
Project Setup and Environment Configuration: Learned how to install Android Studio, configure the SDK, and set up an emulator or physical device.
App Structure and Navigation: Built a 3-page app using Android activities, a side drawer for navigation, and functional buttons that guide users through each page.
Coding and Testing: Implemented both front-end (UI) and back-end (logic) code, tested the app on emulators or devices, and ensured the flow between pages was seamless.
Next Steps for Enhancement: To continue expanding skills, you might consider:
Adding Functional Components: Make the static search bar interactive by adding search functionality.
Incorporating Animations: Use animations for smoother transitions between pages.
Improving UI Design: Customize the layout further with colors, images, or modern UI elements.
These additions would allow you to take your app from a basic functional prototype to a more engaging, polished application. With these foundations, you can confidently dive into more complex Android development projects.
Want to Build a Full-fledged Android App?
Let’s collaborate on your project and launch a scalable Android application in the market.
So, if you are aiming to make an Android app, discover how we enable our clients to build their full-fledged Android applications.
In this guide, we’ve built a basic 3-page Android app, but developing a full-scale mobile app for business requires professional expertise. At Trango Tech, we bring global experience and technical versatility, providing high-quality Android app development solutions tailored for businesses.
Here’s an in-depth look at our process, each step crafted to ensure that your app is feature-rich, optimized, and impactful.
1. Ideation & Planning
The first step involves defining your app’s vision, core features, and end goals. Trango Tech’s team collaborates with you to deeply understand your business objectives, target audience, and app functionality.
Using Android Studio as the primary development environment, we carefully select programming languages and the latest frameworks that suit your project’s requirements. This planning phase includes mapping out app architecture, defining user flows, and creating a development roadmap. As a result, we ensure the project progresses efficiently with milestones that align with your timeline.
2. UI/UX Design
Design is crucial in creating a seamless and engaging user experience. Leveraging Material Design principles, we design the user interface focusing on aesthetic appeal and functionality. Our design team crafts layouts, views, and navigation that make each interaction smooth and enjoyable.
To ensure intuitive navigation, we organize elements like icons, buttons, and screens logically and visually appealingly. Through prototyping and iterative feedback sessions, we refine the design until it perfectly aligns with your brand and meets user expectations.
3. Core Development
Our developers build Android app’s core components, like Activities, Services, Broadcast Receivers, and Content Providers, using Gradle for project organization and dependency management. Features like push notifications for user engagement, user authentication for secure logins, and in-app purchases for revenue generation are implemented using best practices.
We may choose to integrate SQLite for local data storage if the app is simple or connect to cloud-based solutions such as Firebase for syncing data in real-time. The app is built with REST APIs and third-party integrations to add functionality and seamlessly integrate with different services.
4. Quality Assurance Testing
We assure quality and reliability—and rigorously test this with Espresso (UI testing), JUnit (unit testing), UI Automator (functional testing), and the Android Emulator running on virtual devices.
What we do is test each feature out across multiple devices, screen sizes, and Android versions to make sure each one performs the same each time. We write clean code, run QA, and test gathering navigation, working component functionality, and performance metrics of: growing to assess and fix issues prior to release.
5. Monetization Strategy
We assist you in knowing that most times successful apps monetize successfully and help you implement how to monetize depending on your revenue goals.
We either integrate in-app ads (for ad-based revenue), subscriptions (for recurring income), or a freemium model (where users enjoy premium features through in-app purchases). Instead, each monetization approach is tailored to enable a non-intrusive user experience with maximal potential revenue streams.
6. Deployment
When the testing is complete and the app is refined, we prepare it for launch. Using Android Studio, we generate APKs and app bundles required for deployment on the Google Play Store.
Our team assists with the Play Store listing optimization, ensuring the app is discoverable with optimized descriptions, keywords, and visuals that attract users. We also guide you through setting up the necessary credentials and policies to ensure your app meets Google Play’s compliance standards.
7. Maintenance & Updates
Once we launch, we focus on long-term success through maintenance and maintenance updates. Secondly, our team monitors the app for bug repairs and supports app compatibility with the latest Android OS updates.
Moreover, we resolve user feedback to improve the app’s features and user experience. The promise of continuous improvements makes sure the app stays on track with user needs, as well as being stable over new Android versions and device combos
By partnering with Trango Tech, you get an experienced team at your disposal, to take your app concept and bring it to life. From start to end, we work with you to develop a reliable, user-friendly, and scalable app that meets your business goals and generates value for users around the world.
FAQs
How can I create my own Android app?
Before you create Android apps, install Android Studio on your computer if you haven’t done so already.
Create a project using the template.
Find project files.
Update the text.
Change the background color.
Add padding.
Review the solution code.
Is making an Android app hard?
In general, building Android apps can be quite complicated, especially when it comes to creating complex applications. It is better to spend some time learning the basics before you start working on more complex projects. In any development process, it is difficult to know exactly what an application should be.
Is it free to make an Android app?
Yes, you can create an Android app for free using specific platforms and services. Thanks to pre-built templates, drag-and-drop interfaces, and automatic code generation, these platforms can help you build an app without any coding knowledge.
What programming language is used for Android apps?
Java has been the official language for Android, but Kotlin has emerged as a popular choice for developers due to its modern features and ease of use. C++ and C# are also great choices for native apps, while Python is useful for scripting and rapid prototyping.
How much time does it take to build an Android app?
Typically, building a fully-fledged Android app requires 1 to 6 months. To help you make an informed decision faster, here is a rough breakdown of how long it takes to develop an application for Android. Now, let’s look into the requirements to build each type of app, and how such factors affect the development length.
How much does it cost to build an Android app?
Industry reports suggest the average Android app development cost ranges from $30,000 to $250,000, influenced by complexity and features. Whether you’re a startup or an established business, comprehending the Android app development Cost dynamics is essential for successful Android app development.
Is it profitable to make Android apps?
Mobile apps are also a great way to acquire new customers, which also generates more money. That’s especially true if you’re an e-commerce business. Look how many mobile shoppers there are in the United States alone. There’s plenty of room for you to succeed if you think your app will be the next big hit as well.
Ali Hassan, a dynamic content creator with four years of hands-on experience specializing in tech writing. As a skilled content strategist, Ali seamlessly blends creative finesse with thorough research to craft top-notch content. With a keen eye for optimization techniques, he transforms ideas into engaging, SEO-friendly narratives that captivate tech enthusiasts and novices alike.